

Table of Contents
Think about the mouthwatering aroma of a perfectly Roast Chicken in a Roaster Oven Recipe filling your kitchen. The crispy golden skin crackles with flavor, promising a delicious meal. Roasting chicken in a roaster oven isn’t just cooking—it’s creating memories that last beyond the dinner table.
Transforming an ordinary chicken into a culinary masterpiece requires skill, technique, and the right equipment. With these roast chicken in roaster oven recipe tips, you’ll unlock professional-level roasting techniques. These techniques guarantee a succulent, flavorful bird every single time.
Whether you’re a home cook looking to elevate your dinner game or someone passionate about creating restaurant-quality meals, this guide will walk you through every step. You’ll learn how to create the ultimate roasted chicken using a roaster oven.
Key Takeaways
- Master roasting techniques for consistently delicious chicken
- Learn how to select the perfect chicken for roasting
- Understand optimal temperature and cooking times
- Discover secret seasoning blends for maximum flavor
- Gain confidence in using a roaster oven for perfect results
Benefits of Using a Roaster Oven for Chicken Recipe
Roaster ovens have changed home cooking for the better. They offer many benefits for making tasty chicken dishes. These gadgets cook well and save space in modern kitchens.
Roast Chicken in Roaster Oven Recipe
Equipment
- Roaster Oven To cook the chicken evenly and keep it juicy.
- Roasting Rack To elevate the chicken for better air circulation.
- Cutting Board & Sharp Knife For prepping the chicken and vegetables.
- Measuring Cups & Spoons For accurate seasoning and broth measurements.
- Basting Brush To apply the olive oil or melted butter evenly.
- Instant-Read Thermometer To check the internal temperature for doneness.
- Serving Platter For presenting the carved chicken beautifully.
- Aluminum Foil (Optional) To tent the chicken while resting.
Ingredients
- 1 whole chicken 4-5 lbs, giblets removed
- 3 tablespoons olive oil or melted butter
- 1 tablespoon kosher salt
- 1 teaspoon black pepper
- 1 teaspoon garlic powder
- 1 teaspoon onion powder
- 1 teaspoon smoked paprika
- 1 teaspoon dried thyme or 2 sprigs fresh thyme
- 1 lemon quartered
- 1 onion quartered
- 4 cloves garlic smashed
- 2 carrots cut into chunks (optional)
- 2 celery stalks cut into chunks (optional)
- 1 cup chicken broth for moisture
Instructions
Preheat the Roaster Oven:
- Preheat the roaster oven to 350°F (175°C).
- Add chicken broth to the bottom of the roaster for added moisture.
Prepare the Chicken:
- Pat the chicken dry with paper towels.
- Rub the chicken with olive oil or melted butter.
- Season generously with kosher salt, black pepper, garlic powder, onion powder, smoked paprika, and dried thyme.
Stuff the Chicken:
- Stuff the cavity with lemon quarters, onion quarters, and smashed garlic cloves.
- If desired, place carrots and celery chunks around the chicken for added flavor.
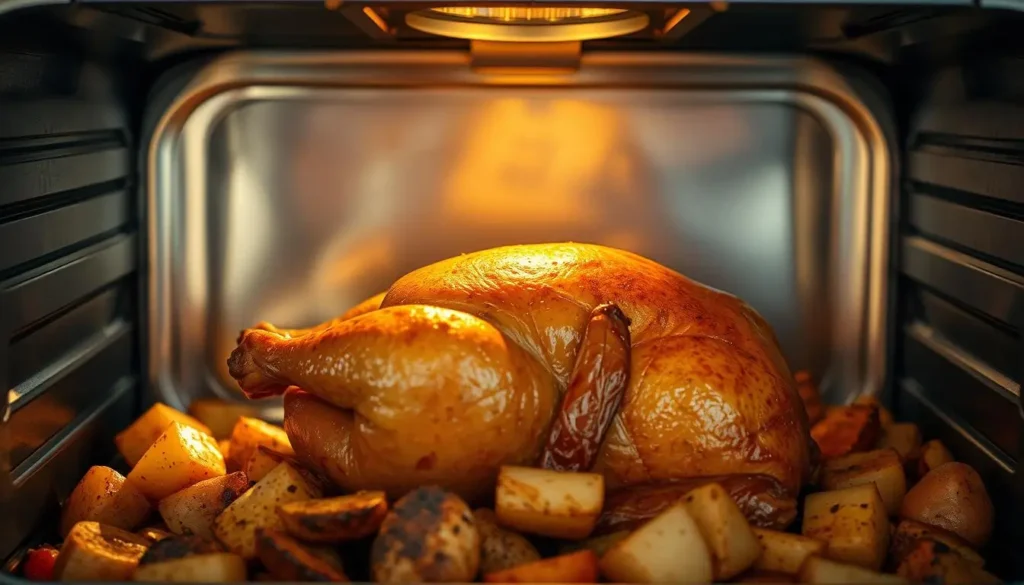
Roast the Chicken:
- Place the chicken on the roasting rack inside the roaster oven.
- Cover and roast for 1 hour 30 minutes to 2 hours, or until the internal temperature reaches 165°F (74°C) in the thickest part of the thigh.
Crisp the Skin (Optional):
- For extra crispy skin, remove the chicken from the roaster oven and place it under the broiler in a conventional oven for 3-5 minutes.
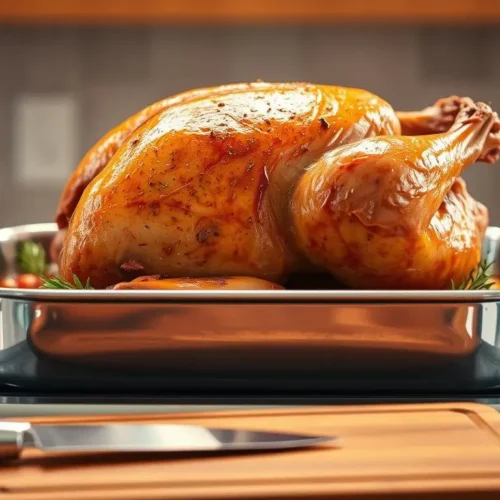
Rest & Serve:
- Let the chicken rest for 15 minutes before carving.
- Serve with roasted vegetables, mashed potatoes, or a fresh salad.
Video
Notes
- Calories: ~400 kcal
- Protein: ~30g
- Carbohydrates: ~4g
- Fiber: ~1g
- Sugar: ~2g
- Fat: ~28g
- Saturated Fat: ~8g
- Cholesterol: ~110mg
- Sodium: ~800mg
- Potassium: ~450mg
Energy Efficiency and Space Saving
Roaster ovens are great for saving energy. They use less electricity than old ovens, which is good for the planet. Their small size also means you can use more kitchen space for other things.
- Reduces energy consumption by up to 30%
- Occupies minimal counter space
- Perfect for small kitchens or apartments
- Provides extra cooking capacity without bulky equipment
Even Heat Distribution
Roaster ovens cook chicken evenly. This means no dry or undercooked parts. They make cooking times more predictable and easier to manage.
| Cooking Method | Heat Consistency | Cooking Time Efficiency |
|---|---|---|
| Traditional Oven | Uneven | Longer |
| Roaster Oven | Uniform | More Efficient |
Versatility in Cooking Methods
Roaster ovens aren’t just for roasting. You can bake, steam, and slow-cook with them. This makes them a versatile tool for trying out different chicken recipes.
- Roasting: Traditional whole chicken preparation
- Baking: Crispy skinned chicken dishes
- Steaming: Healthy, moisture-rich cooking method
- Slow cooking: Tender, fall-off-the-bone results
Essential Equipment and Kitchen Tools
Getting the perfect roast chicken is more than just knowing how to cook. The right kitchen tools can make a big difference. They ensure your meals are always tasty.
Here are the must-have tools for roaster oven chicken:
- Digital meat thermometer
- Kitchen twine for trussing
- Basting brush
- Sharp carving knife
- Long-handled kitchen tongs
The roaster oven you choose is key to good cooking. Look for kitchen gadgets that are both quality and useful. A good meat thermometer is essential. It helps you cook the chicken to a safe 165°F.
| Kitchen Tool | Purpose | Recommended Features |
|---|---|---|
| Meat Thermometer | Check internal temperature | Digital, instant-read |
| Kitchen Twine | Truss chicken | 100% cotton, food-grade |
| Basting Brush | Apply marinades | Silicone, heat-resistant |
| Carving Knife | Slice roasted chicken | Sharp, stainless steel |
Pro tip: Invest in high-quality kitchen gadgets that will enhance your roasting experience and help you create consistently delicious meals.
Selecting the Right Chicken for Roasting
Choosing the perfect whole chicken for your electric roaster recipes is key to a tasty meal. The chicken’s quality and type affect the flavor, texture, and success of your roast.
Size and Weight Considerations
When picking a whole chicken for your electric roaster, consider these weight guidelines:
- Game hens: Less than 2 pounds
- Broiler/Fryer chickens: 2.5 to 4.5 pounds (ideal for most families)
- Roaster chickens: 5 pounds or more
Fresh vs. Frozen Options
The chicken’s freshness greatly impacts your dish. Fresh chickens usually taste better and feel softer. Here are some tips:
- Fresh chicken should be cooked within 1-2 days of purchase
- Frozen chickens can be stored up to two months for optimal quality
- Always thaw frozen chicken completely in the refrigerator before roasting
Organic and Free-Range Choices
For the most delicious whole chicken in electric roaster recipes, look for these certifications:
| Certification | Key Requirements |
|---|---|
| USDA Certified Organic | Outdoor access, organic slaughterhouse processing |
| Certified Humane | Ensures ethical animal treatment |
| Animal Welfare Approved | Mandatory pasture access |
Choosing the right chicken makes your roasting experience amazing. Focus on weight, freshness, and certifications to make your electric roaster chicken recipe stand out.
Preparing Your Chicken for the Roaster
Getting your chicken ready for roasting is all about the details. The right prep can make your dish taste better. Before you start, make sure you have all your tools and flavor enhancers ready.
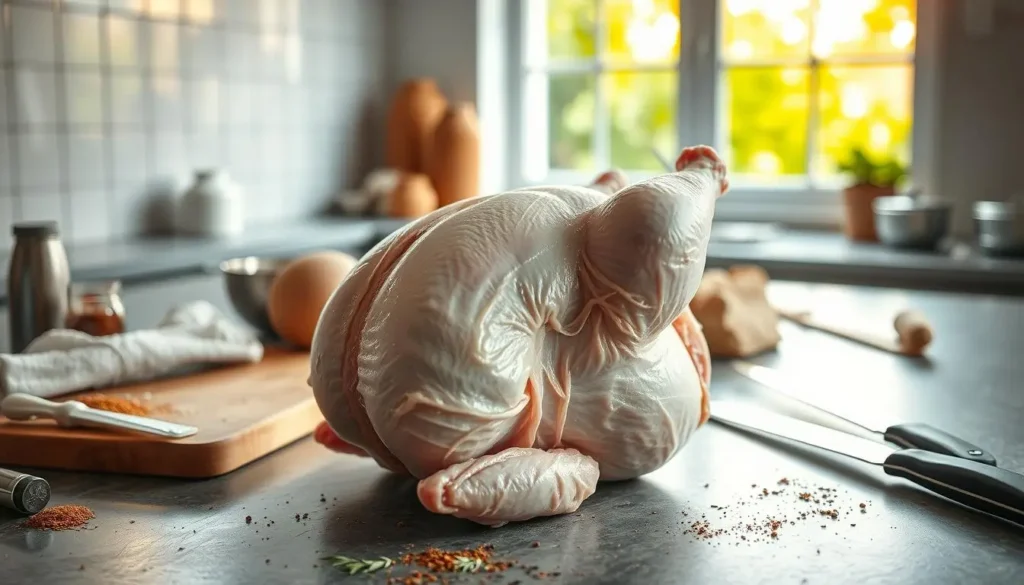
First, check your chicken. If it has giblets inside, take them out. The CDC says not to rinse raw chicken to avoid Salmonella. Instead, dry it with paper towels.
- Check chicken weight (recommended range: 4.5 to 6.5 lbs)
- Remove giblets from cavity
- Pat chicken completely dry with paper towels
- Inspect for any remaining feathers or unwanted bits
For the best flavor, use these flavor enhancers:
- Stuff the cavity with aromatics like:
- Fresh lemon slices
- Whole garlic cloves
- Fresh herb sprigs (thyme, rosemary)
- Truss the chicken using kitchen twine (approximately 18 inches)
- Let seasoned chicken rest in refrigerator for 20 minutes to overnight
Pro tip: Use twine to tie the legs and wings to the body. This helps the chicken cook evenly. A well-prepared chicken means delicious results every time.
Perfect Seasoning Blend for Roast Chicken
Making the perfect seasoning for your roast chicken is an art. It turns a simple meal into a masterpiece. The right mix of herbs, spices, and marinades can make your chicken stand out.
Herb Combinations That Sing
Your roast chicken needs a mix of flavors. Try these herb blends to make your chicken irresistible:
- Classic Herb Mix:
- 1 tablespoon fresh rosemary
- 1 tablespoon fresh thyme
- 1 tablespoon fresh sage
- 2 teaspoons minced garlic
- Pro Tip: Chop herbs finely and mix with softened butter for maximum flavor penetration
Spice Mixtures for Bold Flavor
Spice blends can make your chicken bold. Try this robust seasoning mix:
- 2 tablespoons paprika
- 1 tablespoon garlic powder
- 1 tablespoon onion powder
- 1 teaspoon cayenne pepper
- 1 tablespoon kosher salt
- 1 teaspoon black pepper
Marinade Magic
Marinades add deep flavor to your roast chicken. A Mediterranean-inspired marinade is great:
- 1/4 cup olive oil
- 2 tablespoons lemon juice
- 4 minced garlic cloves
- 1 tablespoon mixed fresh herbs
- Salt and pepper to taste
Remember, use plenty of seasoning. Some flavor will be lost during cooking. So, don’t hold back on spices and herbs. Your taste buds will love the memorable roast chicken experience.
Roast Chicken in Roaster Oven Recipe
Making a tasty roast chicken in a roaster oven is simple. This recipe will guide you to a meal that will wow your loved ones.
Ingredients You’ll Need
- 1 whole chicken (5-6 pounds)
- 2 teaspoons kosher salt
- 1 tablespoon olive oil
- 2 cloves garlic, minced
- Fresh herbs (rosemary, thyme)
For a boneless roast chicken, follow these easy steps. First, dry the chicken with paper towels. This step is key for that crispy skin everyone loves.
Preparation Method
- Preheat your roaster oven to 425°F (218°C)
- Mix olive oil, minced garlic, and herbs
- Apply the mixture evenly over the chicken, making sure to get under the skin as well.
- Truss the chicken using about 2 feet of kitchen twine
- Place the chicken breast-side up on the roaster rack
Cooking time is important for a great roast. Cook for about 20 minutes per pound. For a 5-6 pound chicken, cook for 80-90 minutes. Make sure the chicken’s internal temperature is 165°F.
Pro Tips
- Air dry the chicken in the refrigerator for 24 hours for extra crispiness
- Allow the chicken to sit for 10 minutes once it’s done cooking.
- Use a meat thermometer to check doneness
This roasted chicken is not only delicious but also healthy. It has about 336 calories per serving, with 46g of protein and just 5g of carbs. It’s a great choice for any meal.
Temperature Settings and Cooking Times
Mastering cooking times and temperature settings is key for a slow roast chicken in an electric roaster. Getting these right ensures a juicy, flavorful dish that will wow your guests.
The temperature of your roaster oven is crucial for a perfect roast chicken. Most home cooks aim for a temperature between 375°F and 425°F. Here’s a guide to cooking times based on chicken weight:
- 2½- to 3-pound chicken: 1 to 1¼ hours
- 3½- to 4-pound chicken: 1¼ to 1½ hours
- 4½- to 5-pound chicken: 1¾ to 2 hours
For a perfectly cooked chicken, watch its internal temperature. The USDA says to reach 165°F in the thickest part of the breast and thigh. Pro tip: For even more tender meat, aim for 170°F in the thigh area.
Using a slow roast method in your electric roaster, cook at about 275°F for up to 8 hours. This makes the meat incredibly tender. Always use a meat thermometer for food safety and the best results.
Remember, cooking times can change based on your roaster oven model and chicken size. Patience and precise temperature control are essential for a delicious roast chicken every time.
Basting Techniques for Juicy Results
Basting is a key roasting technique that turns a simple roast chicken into a masterpiece. By coating your chicken with flavorful liquids, you get a moist, golden-brown result. This will impress anyone who tries it.
Choosing the right basting liquids can greatly enhance your chicken’s taste and look. Let’s look at the best basting strategies to improve your roasting skills.
Optimal Basting Frequency
The timing and consistency of basting are crucial. Here are some tips:
- Baste every 20-30 minutes during cooking
- Use quick, efficient motions to minimize heat loss
- Aim for 3-4 total basting sessions during the roasting process
Best Basting Liquids
Choosing the right basting liquid can greatly improve your chicken’s flavor and look. Here are some top choices:
| Basting Liquid | Flavor Profile | Skin Result |
|---|---|---|
| Melted Butter | Rich, classic | Golden brown |
| Olive Oil | Light, heart-healthy | Crisp |
| Chicken Drippings | Intense, natural | Deep amber |
| Herb-Infused Broth | Complex, aromatic | Glossy |
Pro tip: Try adding fresh herbs or a splash of lemon juice to your basting liquid for more flavor.
By learning these roasting techniques and using the right flavor enhancers, you’ll make a roast chicken that’s juicy, beautiful, and delicious.
How to Tell When Your Chicken is Done
Figuring out when your roast chicken is cooked just right can be hard. The best way is to use a meat thermometer to check the inside temperature. It’s important to be precise with cooking times and temperatures to ensure your chicken is both safe and tasty.
To make sure your chicken is safe to eat, follow these important temperature guidelines:
- White meat chicken should reach 165°F
- Dark meat chicken requires 180°F
- Remove whole chicken from oven at 155°F-157°F
- Remove chicken breast at 162-163°F
To get the most accurate reading, put your meat thermometer into the thickest part of the thigh. Make sure it’s not touching the bone. The temperature should be 165°F in all parts of the chicken. This way, your chicken will be cooked perfectly without drying out.
If you don’t have a meat thermometer, there are other ways to check:
- Insert a knife into the thickest section of the thigh.
- Check if juices run clear (not pink)
- Verify that leg joints move easily when wiggled
Keep in mind, cooking times can change based on your roaster oven, chicken size, and starting temperature. For the best accuracy, always check the temperature with a meat thermometer.
Resting and Carving Your Roasted Chicken
After you’ve cooked your old fashioned roast chicken, the last steps are key to a tasty meal. It’s not just about cooking. How you handle the chicken after it’s done is important too.
Proper Resting Time
Let your chicken rest for 15-20 minutes before you carve it. This time lets the juices spread evenly, making each bite juicy and full of flavor. While it rests, you can get your side dishes ready or make a quick gravy with the pan drippings.
Expert Carving Techniques
Carving a roast chicken needs care and patience. Here’s how to get it right:
- Remove the legs by cutting at the joint where they connect to the body
- Separate thighs from drumsticks
- Make a horizontal cut along the breastbone
- Slice downward to create even breast portions
- Carefully remove the wings
For the best results, use a sharp knife and cut against the grain. This makes the meat tender and easy to eat. It shows off your skill in making an old fashioned roast chicken recipe.
Pro tip: Always let your chicken rest on a cutting board with a slight tilt to allow excess juices to drain, keeping your carved meat perfectly moist.
Conclusion
Learning to make a perfect roast chicken in a roaster oven is a journey. It takes skill, patience, and precision. Your recipe needs to understand key techniques to make a great meal.
Choosing quality chicken is the first step. Then, use consistent roasting techniques to get tender, juicy meat.
Temperature control is key in roasting. Aim for an internal temperature of 150°F when you take it out of the oven. Let it rest at 160°F for safety and flavor.
Cooking a 4-pound chicken for 1 to 1.5 hours is best. This ensures even cooking and the best flavors.
Roasting gets better with practice. Each time, you’ll get better at managing heat, seasoning, and cooking time. Your roaster oven will make any meal special, whether it’s for a weeknight or a big event.
Your cooking skills will grow as you try new things. Don’t be afraid to try different herbs and spices. Enjoy the tasty outcomes of your roasting experiments.